
 We know that some of our readers are fond of folk crafts, and of spinning and weaving in particular. So, we’d like to offer you kind of a tutorial on spinning yarn on a wheel. This method of spinning is more modern than, for instance, spinning with a drop spindle, and it is much easier and more effective. With a little bit of experience, practically anyone can master it. So, if you’re big on traditional clothing crafts, you definitely should try spinning yarn on a wheel.
Hi, I'm Chandi and I'm going to show you today how to spin yarn. It's way awesome. If you're a knitter or crocheter or weaver and you want to take your craft to the next level, you have to try spinning. It's the coolest thing to be able to make yarn, and then you take that yarn and make it into something else. It's mind-blowing. You can do so many colors, so many options, you can do multiple plies, you can use a drop spindle or a wheel. It's so exciting but it's also so meditative and centering. So let's get started.
Setting up the wheel
I'm using my Lendrum Saxony 28-inch double-treadle wheel. Let’s start by arranging the wheel.
You want to place your bobbin onto your flyer and screw on the whorl.
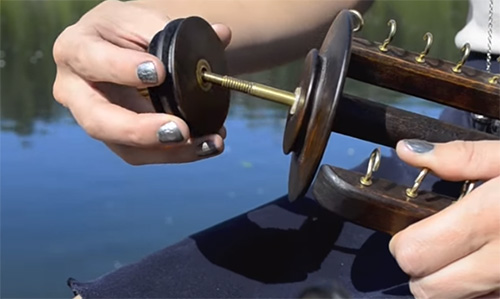
Remember that each spinning wheel is going to be different, so you'll want to follow the instructions you get on how to set yours up.
Then, you insert the flyer into your mother-of-all. There are two strings: one is going to go on the bobbin and one goes on the whorl. You want to also make sure that the bobbin spins freely inside the flyer – if the bobbin is not spinning freely, you're not going to have a pleasant experience, the yarn just won't take up on to the bobbin.

So, go ahead and get some scrap yarn, double it, wrap it around your bobbin, and pull it through. If this isn't tight enough – you really want it to be very tight so that it does not slip around the bobbin – you can go ahead and wrap it around again. After you wrap the scrap yarn through the hooks on the flier, use a spinning wheel hook (or just a crochet hook, if you don’t have one) to pull the yarn through the orifice.
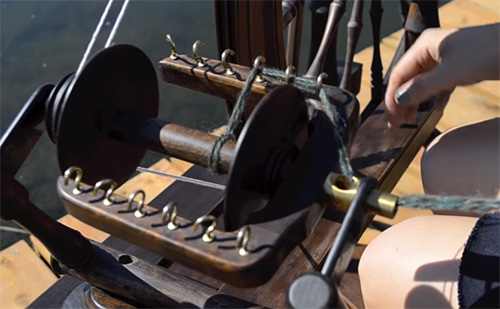
We need to test the wheel first, to make sure that our yarn is going to take up onto the bobbin properly. See how it feeds in, how much it twists, is it easily going onto the bobbin.
Different spinning methods
The whole purpose of a spinning wheel, basically, is to introduce a twist into the roving and then pull that newly-made yarn onto the bobbin. It seems like a big setup just to twist some wool, but it's awesome.

All right, there are several different ways to spin.
One way is to go ahead, separate out a chunk and pull off a section. Once you've got your section, you can actually just start spinning right from the end if you want. Some people like to pre-draft, which is where you basically pull out little sections – you're sort of getting it ready to spin. But you don't have to do that step, that's up to you.
Another thing that you can do is to spin from the fold, where you actually fold your roving in half. You can also split the roving in half lengthwise and then, separate it in half lengthwise again.
I'm going to show you how to spin from the end of that. Grab your lead yarn and you want to lay your roving onto that, start your wheel with a little shove, and let the roving twist onto that starter yarn.

Here's one more method. This is called a “short draw”. You pull tiny snippets of roving forward, your right hand just sits there, it doesn't do much. The left hand in this method is doing all of the work. Hold the roving loosely and inch the roving forward with your left hand. Some people call this the “inchworm method”.
Another method is to pull back with the roving, just pull back little snippets. And so the spinning goes on.
Also, there’s a different method. It is great if you've got a fiber with a shorter staple length. If you have a fiber with short to medium staple length, you can do this method. Just pull back a long strand and adjust the amount of twist that goes into the roving with your left hand, while pulling back a long stretch with your right hand. This allows for really speedy and easy spinning, it's really easy on your hands, your wrists aren't going to get tired if you spin a lot. So, this is called the “long draw” method, and again, it doesn't work well with long staple length.
You want to just play around with different methods and whatever feels comfortable for you, just do that.
As you start filling up your bobbin, you'll want to move your yarn to different hooks, so that different parts of your bobbin fill up. It can be a little difficult at first – you might find your roving breaking or you're just not getting the right amount of twist or it's super lumpy-bumpy, but that's okay.
If – or rather when – your roving breaks, don't freak out. It’s easy to fix. Just lay it back on and keep going.

If you’re a newbie to spinning, just get that first skein of yarn spun. Whatever it looks like, it'll be beautiful – it's your first try, don't expect it to be perfectly smooth, it’s your first go-around. Good luck!
(c)