 Spinning is one of the oldest clothing crafts in the world. Centuries ago, people used to make clothes at home, and they sewed it from hand-made fabrics that they had to produce themselves. In different countries, the process and tools for spinning and weaving differ. Let’s talk about Scottish drop spindle and the local spinning technique. Interesting fact: the thick end of the oldest known spindles in Scotland often were shaped like an animal's paw pads. Cute, isn’t it?
What is a dealgan? How does it look like?
Fairsaid, farsadh, dealgan – names for the Scottish drop spindle.
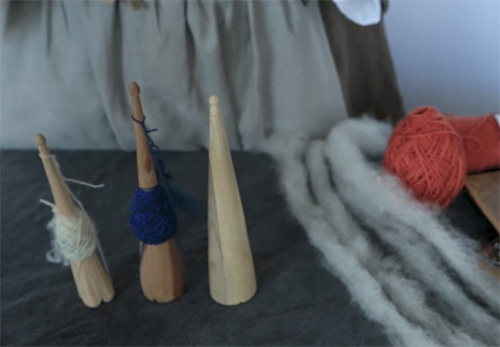
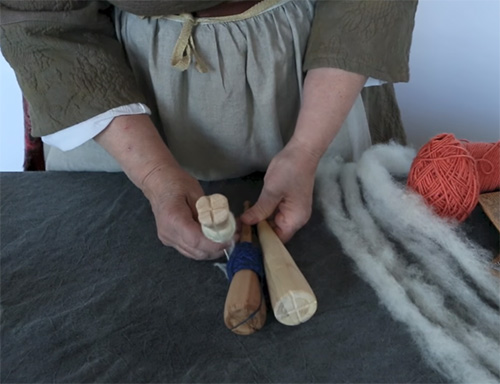
It is a very interesting tool. And there's nothing thin or delicate to break in it. It easily goes into a pocket or into the back of a plaid, and women can carry it around and pull it back out.
Dealgan common features:
1. cone shape;
2. knob at the top;
3. bottom cross;
4a. no whorl;
4b. pull ball.
So, what identifies them? They basically have 4 rather unique features. And the first thing is the cone shape or the tapered shape. The next thing is – at the top they have a very small knob, all of them do. On the bottom, a very identifying feature, they have a cross cut into the bottom. But the oldest surviving example we know of has a cross that basically is sculpted to look almost like the top of a bone or an animal's paw pads. And it really does facilitate the use of the cross when you are tensioning the yarn before spinning.
Process of spinning. Dressing a dealgan
In order to start spinning, you have to dress you're dealgan with a leader yarn. And that is rather simply done but slightly tricky. You're going to go round and round and round with yarn single that's already spun, and then up, down. You stop when it's in the up position. Push it down. Come around and knotch into one side of the cross. From side to side. Wrap it around your thumb and half hitch under the knob. You have to hold the spindle by its narrow end. And now, it's set up and ready to spin.

But: there's more than one way to wind the yarn. And with the dealgan down here, there are actually three or four different ways. I think I'd better show you the most common way to wind it on, not one of my experimental ways. Basically, I'm going to use regular yarn, already spun, to show you the winding on. You'll see that I've already wound on with blue yarn.
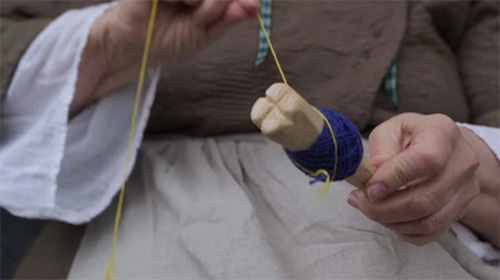
We're going to pretend that I have made some more yellow yarn and spun it on. So, I'm releasing it from the top, I'm unwinding it from the bottom, and I want to wind this on. Anybody who is familiar with the Scandinavian nostepinne ball winder will recognize the technique. So we're going to have to pretend that I'm going to be spinning yellow yarn and I'm getting ready to wind it on. Oblique angle, turn it a little, oblique angle, turn it a little, oblique angle – it's about a 45 and I'm doing this right-handed. So, what happens is exactly like nostepinne winding – it makes a pull ball, quite tightly wound, where it will pull evenly out from the center or it will pull evenly out from the outside of a nostepinne ball.
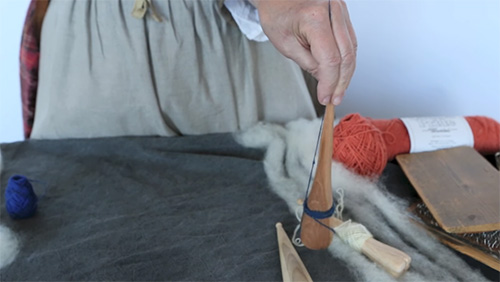
When I get done, I always start from the top of the ball closest to the narrow end. Pull it down through one of the sides of the cross and bring it up under tension to make the half hitch, and tighten it so this is firm. That way, it does not release when you go back to spinning your dealgan.
Spinning with the dealgan
I'm spinning clockwise with my left hand right now. The thread is going between my index finger and my middle finger. I am taking my thumb and I'm rolling that knob against the pads of my finger with my thumb. It is possible with some of these to use your thumb and your index finger and roll down or roll up with your thumb along your index finger. But picture after picture shows this type of handling to make the twist – along the pads of your fingers inside. I'll do that right-handed because I'm a nice person. I'm not as good with my right hand.
And then, when you're ready, we're going to spin with the dealgan. I'm getting in the upper position, going around the base, half of the cross, making sure I have enough to do my half hitch of yarn, and beginning the twist and the drafting.
When I feel the yarn and I feel there's enough twist, I store it away in the center section of the spindle stick, up and down. I'm not being very careful about where I'm laying the yarn, I just make sure I'm rotating this spindle stick.
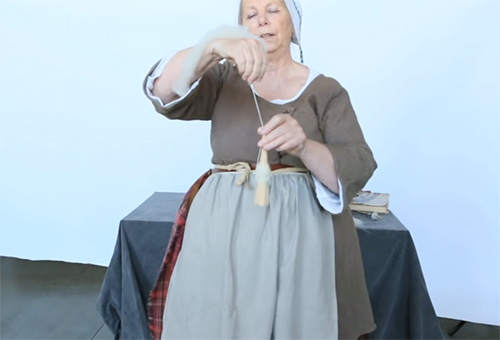
Here you see: it's too short, I can't get the half hitch. I back up to a point where it's top on the top, around the cross at the bottom, half hitch at the top, and begin again. I'm going clockwise, I'm making single spool yarn. You'll see my upper hand pinching and negotiating the twist between the two hands, letting it up into the drafted out fibers that are the size that I'm hoping for. It's a back and forth motion.
This is a one-ounce spindle. By the time you have two ounces of yarn on this, you will be having a hard time getting it to flip around and give you more twists. It slows down. It's time to stop spinning: release the hitch, take it back from the bottom, finish doing your up-and-down winding, slide it off – it'll be much bigger than this. In fact, it might be as big as two ounces.


This is awesome