
 Batik fabric is very popular in Indonesia. A lot of traditional garments are made from this cloth. But it is a hard work to put the design onto the fabric. They dye, bleach, dry, and dye again. Several times in a row. But every extra step is needed and not useless. For me, the most exciting process of the batik production is stamping. Find your favorite step.
Hi, my name is Richard Gross or, as they like to call me in Indonesia, the “Batik Man”. I travel to Indonesia one week out of every month to work on my batik designs and to make sure the production goes well and ends on schedule. I thought it might be interesting to make a little documentary, explaining how modern batiks are made. So, sit back, fasten your seatbelt, and journey with me to Indonesia and let me show you how one batik is made from start to finish. I hope you enjoy the ride.
Every journey of a thousand miles begins with one small step, and it is very much the same with batik production. The worker here is cleaning the floor because applying the dyes by hand is very messy and the floor needs to be cleaned before the next fabric can be processed.
Once the floor has been cleaned, the workers start putting down long sheets of plastic on the floor. Some sort of linoleum-type product. The reason they put this here, is to hold the white fabric that has been wet with water. The white fabric is put on those long sheets of plastic, and the workers begin the process of folding.
Folding the Fabric
Folding the fabric allows the dyes to penetrate unevenly, which enhances the batik effect. The fabric is then folded into a pattern that reduces the width from 44 inches to about 24 inches, and it reduces the length from 15 yards to about 8 yards.
Applying the Motif Dyes
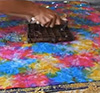
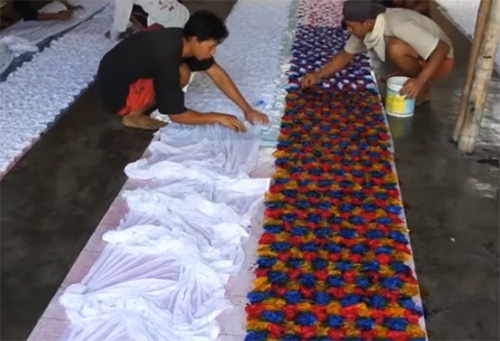
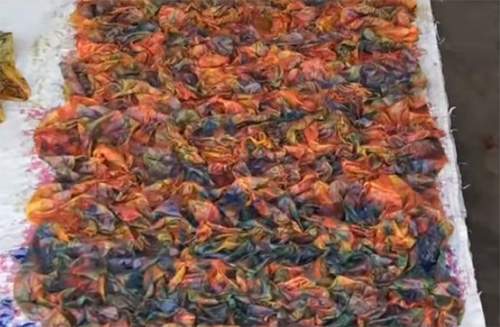
After the fabric has been completely folded, the workers start applying the dye stuff to the fabric. Using a natural sea sponge about the size of a tennis ball, the workers start applying circle-shaped blocks of color on the fabric. The first color applied is red, and you can see how the worker applies this color, leaving space for blue and yellow to follow. It is a mini assembly line: one worker applies the red, another the blue, and, finally, a third worker applies the yellow. It is just beautiful – even at this stage. One thing to note is that these colors will only show up in the printed batik design or the “motif”, as it is called in the tray. It will be protected by hot wax and then removed from all other areas later in the production process. The third worker is just about finished applying the yellow color and, once it is complete, the fabric is taken out of the workroom for the next production step.
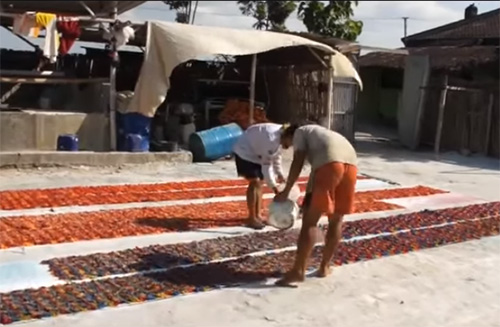
Sun Drying and Soda Ash
Now that the motif colors have been applied to the folded fabric, you can see the workers carrying the long plastic sheet of linoleum out into the bright sunshine. Sun is such an important part of batik production. Since the reactive dyes have not yet been fixed or cured to the fabric, drying them in the sun will fade them slightly. The workers are now sprinkling soda ash, which is a fixative, onto the fabric. They are sprinkling it on in a random or haphazard fashion and, wherever that powder hits the fabric, it's going to cause that area underneath to be just a little bit darker than the surrounding areas, that are fading in the sunlight. This increases the random variation in color that is a unique characteristic of batik fabrics.
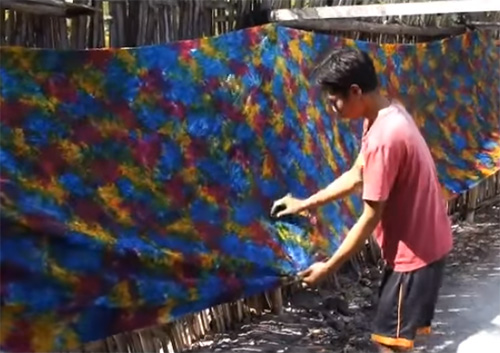
Motif Color Inspection
After batik process, sometimes there are white areas that are not dyed. So the bolt of fabric is hung up on this wooden wall and the workers take little dye sponges to eliminate the white areas so that a whole area of the batik has color.
Setting the Motif Colors
Now, the motif colors have been inspected and all of the white spots have been touched up by hand. It's time to take the fabric to the Water Glass Machine in order to properly fix the colors onto the fabric. A solution of water and soda ash, that the locals call “water glass” is poured into a single-bath Jig Washing Machine. Each yard of fabric runs through the bath for about 5 to 6 seconds and, once the entire batch is complete, it has to sit for about 2 hours for the dyes to be fully set in the cotton. Rather than sit around here and wait, let's take a quick trip to a factory that makes batik stamps out of copper, so we can see how they are made.
Copper Chop Making
Most batiks in Indonesia are made in Central Java, in and around the small city of Solo. As you can see, the environment around these small batik workshops is very rural, residential, even agrarian in some senses. There's a bunch of rice paddies and farms that we passed along the road. Here we are, driving along the back roads of Solo on our way to the stamp making facility. I hope this gives you an idea of the local area that surrounds the batik workshops.
Making copper stamps is a complicated process. One that starts, of course, with the original artwork. But because copper stamps are made of folded bits of metal, there is a limitation to the amount of detail that can be shown, especially when you compare it to pen and ink on paper. Here you see the technician modifying the original artwork, removing some of the detail so that it comes into a format that can be translated into the copper.
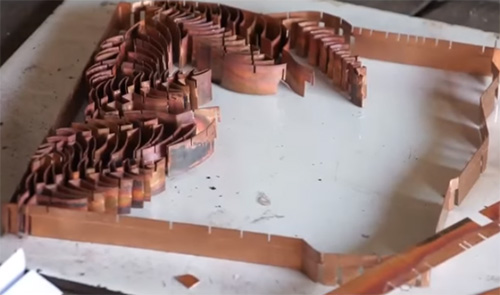
Once the design has been modified, the next step is for the worker to begin forming the copper strips into the pattern design. This involves a lot of cutting, bending, and clamping, in order to manipulate the copper strip to fit into the pattern design. You can see that it's a very intricate and complicated process and takes a lot of time. Workers then tap those designs onto a metal frame, in order to complete the stamp.
Once all the elements are in place, the stamp is dipped into a solution that is made up of melted tree lacquer. The lacquer is boiled in a metal pot over a wood fire. The stamps are put into the metal pot and allowed to soak there for about 20 to 30 minutes. Then, they’re allowed to dry and are polished. After this process, the lacquer holds the thin metal strips together and does not allow them to move when the stamps are pressed onto the fabric.
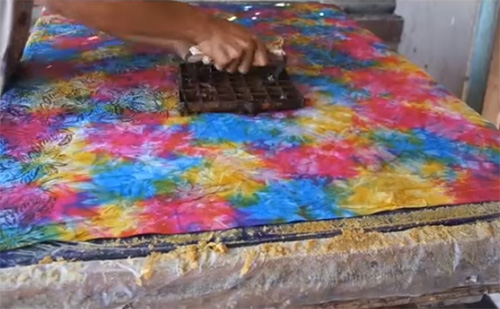
Stamping the Fabric
Now that the stamps have been made, it's time to go over to the stamping room where the workers put the motif colored fabric onto tables and dip the stamp in a solution of paraffin and beeswax that's been melted. You can see him placing the stamp in the pattern and making sure everything lines up – it's really not at all as easy as it looks. I've tried to do this many, many times and have lots of practice, and still, these guys won't let me near the stamping room.
Bleaching the Fabric
Now that I've been kicked out of the stamping room, it's time to take the fabric over to the next production staff, which is bleaching the fabric. As you saw before, the workers stamp the fabric with the hot wax. That wax protects the colors underneath it. Basically, you're going to use the bleach solution to remove all the color from that beautiful tie-dye fabric. It's really a pity to waste all that color but it's absolutely necessary, in order to complete the batik production. The wax protects the red, blue, and yellow colors that the pattern was stamped on, and the bleach solution removes those colors everywhere else on the fabric. It, basically, will leave white or light tints of color where those bright vibrant colors were there before. And as the end result of the bleaching process, you're going to see a white fabric ground with the pattern being colorful. Now, it's a very delicate process – the bleaching. If you do it for too long, the bleach will penetrate the wax and destroy those motif colors. If you do it for too short of time, you won't remove enough dye from the ground. So it's real tricky and has to be monitored very carefully.
Ground Dyeing
Since we’ve just finished bleaching all that beautiful color from the fabric in the previous step, we have to now begin the process of replacing those colors with the ground colors. Unless you want to leave the fabric being mostly white or a little bit of tint of color and the flower motif design being red, blue, and yellow, we have to start dyeing the ground. And in this instance, we start with a tan or tea-color dye bath. The worker manipulates the 15 yards of fabric into a half of plastic barrel, that's been converted into a dye bath. He's just about finished the first lot and he's going to hang it on a pole so that the excess dyes drip back into the container and you don't waste too much. Because the fabric absorbed a lot of the dye, a worker is replacing some liquid into the half barrel, and a new batch of the just bleach fabric will be brought to the bath. He begins the immersion process, pushing that 15 yards down into the barrel, moving it a bit, making sure that the dye penetrates throughout the fabric and the different folds. It's a very thin liquid and it will penetrate very nicely into the cotton fabric. When he finishes manipulating the fabric again, he's going to hang it on the pole and allow the excess dye to drip back. Another worker is squeezing out the remaining wet areas of the first batch and, once that's complete, he will bring it to the next step.
Ground Fabric Folding
Now that the fabric has just been dyed in that light tan or tea-color, the worker puts it on a clean piece of linoleum that's been placed on the floor. He begins folding it in the same exact way that he did with the white fabric that was done at the beginning of the production process. You can see him scrunching the fabric, reducing the width by about half and the length by about half. This folded pattern allows the dyes to be applied unevenly and haphazardly. The fabric looks great like this but the ground looks a little flat, so I think we should add a little bit more color to it.
Ground Spraying
Using bottles that remind me of old-fashioned ketchup dispensers, the worker begins spraying red color onto the folded fabric. The amount of color coverage is about 30%, so it's important to dye the fabric that tan color in the initial step of ground dyeing. Here, you see the worker beginning the application of the second sprayed color – the blue. And again, it covers about 30% of the fabric. A mini assembly line of swartz is formed here by the three workers: the worker on the left, folding the fabric and the two workers on the right, spraying the red and blue colors onto the fabric. These two workers are just about finished with the ground spraying technique. The worker in the cream shirt is just about finishing up the red color – he has about 2 feet more of the fabric to do. And the worker behind him, in the red shirt, who is spraying the blue color, has about 6 or 7 feet to go until both bolts are completed. Once the bolts are completed, the workers will drag the linoleum outside and begin the soda ash process.
Sun Drying and Soda Ash
The next two production processes are exact duplicates of the ones that were used after the motif colors were dyed earlier in the production process. Here, the workers are dragging linoleum outside, so that the fabric, that's just been sprayed, can dry in the sun. Soda ash has been applied to darken the areas that it touches, while the other parts of the fabric fade slightly in the sunlight. Here's a close-up of the fabric after it's been sitting out in the sun for about 15 minutes.
Setting the Ground Colors
After the fabric’s been drying in the sun for about 20 minutes, we head over to the Water Glass Machine, where the worker is adding a solution into the Jig Washer. The fabric is then run through exactly the same process that was done to treat and fix the motif colors. After this, the water glass solution process is finished. The fabric has to sit for another 2 hours and, instead of hanging around here, I think we should tour a batik museum.
Batik Museum
“My name is Erna Adita. I work in the batik museum of Dana Hadi, which is the largest batik museum in Southeast Asia, and I'd love to give you a tour of our facilities”, says the guide in the museum.
Over the course of the next 2 hours, Erna gave me quite an extensive tour of the museum. She explained how Chinese traders influenced the design of Javanese batik. She showed me the batiks that were produced and worn by the benefactors of the batik museum. She explained how the nobility and other different castes in Javanese society could only wear certain batik designs. She told of how, during the Dutch occupation, European fairy-tales and art were incorporated into the local batiks. I want to thank her for the excellent tour she gave me. From my visit, I learned so much about the different periods and styles of traditional Indonesian batiks.
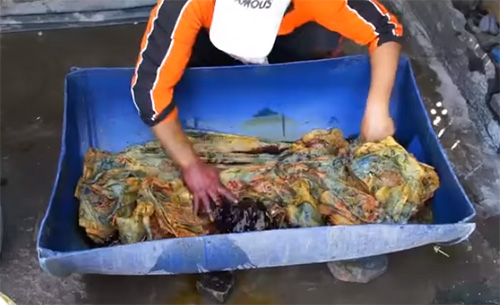
Removing the Wax and Washing
Now that we're back at the batik workshop, first order of business is to start a fire. Workers use wood to heat a cauldron of water. The cauldron contains about 30 to 40 gallons of water and was brought to the boil. The fabric, that has just come from the water glass process as they've been sitting for 2 hours, is now fully fixed. The colors will not fade or come off after the emotion into this boiling liquid. Another bolt of fabric is going to be added to cauldron. I think this cauldron can hold about 45 yards in total. The worker begins agitating the fabric to remove all the wax that has been stamped on it. After a little while of skimming that wax – just like you would a soup that you’re making – the wax is off. This wax is reused, and once it has been removed, they lift it, agitate it some more, and begin to put it on a metal pole.
Now, this is the most dangerous part of batik production, because what could happen is that the fabric can fall from that pole. The agitation and boiling water will splash onto the worker like that, and it's really not a lot of fun. Now that both bolts of fabric have been removed from the cauldron of hot water and the wax has been removed from the fabric, we're about to begin the last process of batik production.
The worker is taking fabric and transferring it to a pool of cold water. Both pieces of fabric will be put there. And then, the last step of the production is washing the fabric. It's important to wash the fabric because some traces of wax might still be on the fabric, and this has to be inspected by hand. You can see the workers use a brush. Once they identify some wax, they use the brush to scrape it off. Also, you can see that, after a while, some wax residue builds up in the pool of water. And again, this will be skimmed off and reused in the future of the batik production.
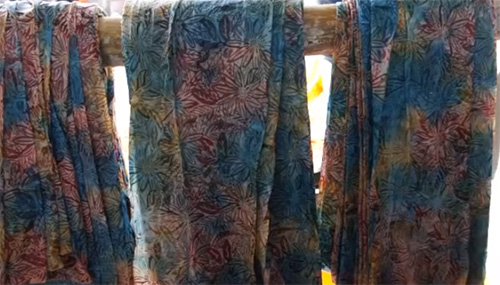
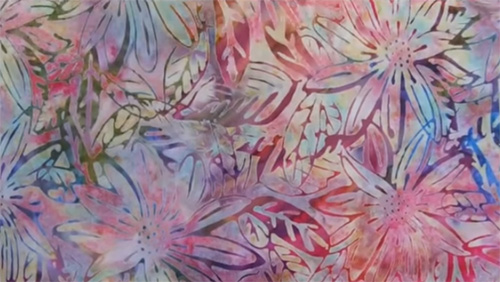
The Finished Batik
All the production processes have been completed. The fabric has dried in the sun one final time. And the fabric is finished. Look at how beautiful it is. If you look carefully, you can see the ground colors that were made up of dyed tan with tints of the sprayed blue and red colors; you could also see the blue, red, and yellow motif colors, that were sponged on earlier in the production and then bleached out from everywhere except those areas protected by the wax. It is just a beautiful design. And I think you can now appreciate the many steps that it took and the toil of all the workers involved over almost two days in order to produce these few bolts of batik fabric.