
 Japanese traditional kasuri textile is a Japanese equivalent of ikat fabric (popular in Indonesia, India, African and Latin American countries, etc.). The process of making the kasuri is complicated and time-consuming. But it is worth the effort – this fabric is beautiful and unique. Here is a detailed story of kasuri making in Japan. You’ll learn something about the traditional patterns, dyeing techniques, weaving tips, and other important steps of producing kasuri fabric.
What is Japanese kasuri?
It is a handmade fabric produced by a special tie-dye technique. First, the yarn is tied, so the dye does not soak in. The tied part remains white after the dyeing, so it becomes the pattern after it is woven. This is what kasuri (ikat) textile is.
Step 1. Traditional designs and patterns on the fabric
All patterns are based on a royal design book of Ryukyu Kingdom era. The motifs are inspired by nature, the human body, and everyday tools. These traditional patterns are still used to create a geometric design.
Pattern – creating a design, based on traditional patterns
The kasuri technique is said to have come from India via Southeast Asia, through trading, during the Ryukyu Kingdom era. In Okinawa, there is a design book called “miezu” which was created for the royal family. That was when patterns were designed. It still is the basis of today’s design.
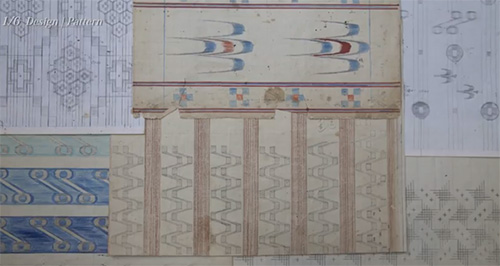
Various traditional patterns of kasuri
Okinawa’s traditional kasuri textile used to be made by common women and they have taken motifs for the pattern from their everyday lives. Typical patterns are such as the “nail” pattern, a shape like a crescent moon, or a bird pattern which is called “tui gwa” in Okinawa’s dialect – probably a motif inspired by a swallow. Also, there are patterns that look like a human fist. Well, of course, there is much more. It is said that there are about 600 to 700 patterns, and we combine typical patterns to create a new design of Ryukyu kasuri. Kasuri textile is a repetition of these patterns.
Step 2. Tying parts of the yarn to make kasuri yarn
Tied parts of the yarn, which will remain white after dyeing, construct a pattern. The tying is still all done by hand for Ryukyu kasuri. It is the largest production area for hand-tied and hand-woven kasuri textile in Japan.
Making of guide yarn – drawing the guide yarn which is used when tying the weft
To make the patterns, we need to weave in the weft yarns that are tie-dyed. To tie the yarn, we first make a guide yarn with marks of the pattern, which we call “taneito” (seed yarn). The parts that are tied remain white after dyeing and become cross patterns during the weaving. The pattern is placed under the cotton guide yarn on the design board and the pattern is copied to the yarn with calligraphy ink. After all the pattern is marked to the guide yarn, it is removed from the design board and used when tying the weft. Each of the parts that become a cross pattern is blacked out.
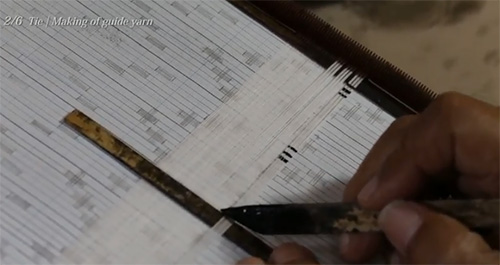
Marking the guide yarn with ink
Yarn preparation – warping the necessary length and amount of yarn
Next, there is the warping process – a process to measure the length, width, and amount of yarn and prepare them for the weaving. It is quite an essential part. The yarn material of Ryukyu kasuri is mainly silk now. When warping, the length of the fabric and its shrinkage is taken into consideration. So that the yarn is prepared in the same tension. Silk yarn is elastic in nature, so without the warping process, the patterns do not match well. After that, the aligned yarn is wound around the hand. Then, it is starched, washed, and dried to prepare for the next tying process.

Warping the undyed threads
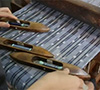
Warp and weft tying – based on the design, the yarn is tied to make a pattern
Tools used for warp tying are marking pen, measuring guide, and aobana dye. The measuring guide is the mark for warp tying. The length and distance for the tie is marked for each pattern. For the weft, there is the guide yarn. For the warp, we take these measuring guides. The warp is tied by repeating these patterns. When tying, first the warp is stretched out and the patterns are marked on them. The measuring guide is overlaid on the warp yarn and marked with a natural blue dye of dayflower, called “aobana dye”. Aobana dye is easily washed off with water, so the marks will not stain.
With cotton yarn, the distance between the marks is tied with an appropriate amount of strength, so that the dye will not soak through. The warp is tied exactly how the measuring guide is marked. Before the weft tying, the yarn is stretched out and is tied firmly on both ends, so that the yarn doesn’t misalign. The guide yarn is overlaid on the weft yarn and the marked parts are tied. Cotton, used for tying, is ideal as it shrinks when wet and stretches back when dried. It is tied in a way that it is easily untied after the dyeing.
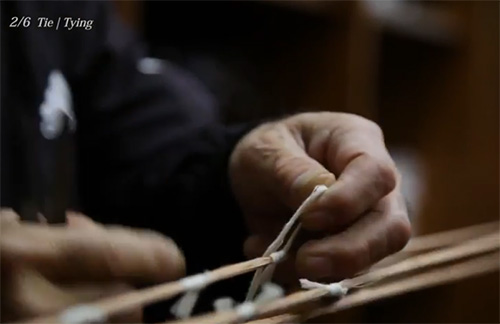
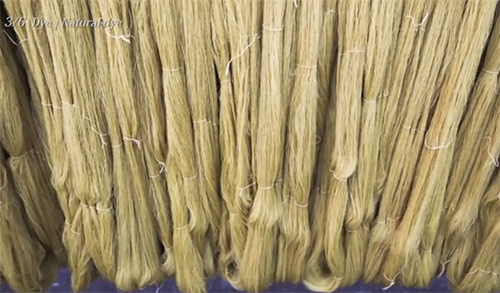
Tying parts of the yarn before dyeing to make kasuri yarn
Step 3. Dyeing the yarn
Natural dye of native Ryukyu indigo, fukugi yellow, and other dyes are used. Also, chemical dyes are used – they allow a variation of colors to be expressed. Both reflect the land, culture, and people of Okinawa, in its beautiful colors.
Indigo dye – making Ryukyu indigo and dyeing the yarn with it
The plant of Ryukyu indigo belongs to the family of Acanthaceae and is a biennial grass. After mowing the indigo leaves, they are brought in the special hangar. People pile up about 2 to 3 tons of the leaves. Then, the leaves are soaked into a tank of 20 tons of water. While the leaves ferment, the indigo pigments dissolve in water. This water is used to make indigo paste, so-called “mud-indigo”. All the indigo leaves are thrown into the tank. In terms of weight, only one-tenth of the leaves become the indigo paste. After all the leaves are thrown in, it is weighed down to sink. The indigo leaves are left to ferment for 3 to 4 days.
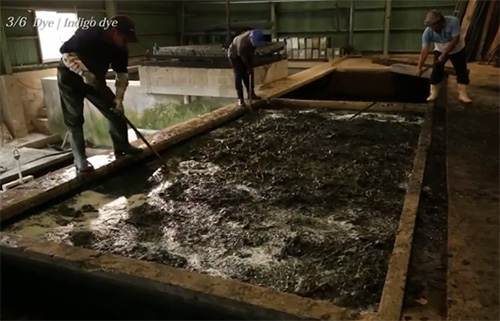
Making indigo dye from indigo plants
A few days later. The leaves are fermented under careful observation of the temperature and humidity. And when the time has come, the weight is lifted and the preparation to add limes begins. In this process called “ee nuji”, the indigo pigments are taken out. It’s a very important process, and the quality depends on when it is done. Usually, it is done 3 to 4 days later, having 2 to 3 days in between. Lime is added and stirred, so that indigo solidifies and settles at the bottom. The tank, full of indigo leaves, contains the liquid with dissolved indigo and this liquid is poured down into the lower tank. The indigo liquid with pigments of Ryukyu indigo dissolved and is poured down until the lower tank is full. The liquid is alkalized by adding lime powder. In the first water tank when the indigo leaves are fermented the pH level decreases from 6.5 to about 5.7 or 5.8, and the liquid acidifies.
If we leave it in this condition, the indigo pigments start to rotten and will eventually get destroyed. That is why we add lime, in order to alkalize the liquid which stabilizes and solidifies the indigo pigments making them settle at the bottom. As lime is added and oxidized, the foam starts to turn blue. The liquid is condensed for several weeks until we can finally deliver it in a paste form (mud-indigo).
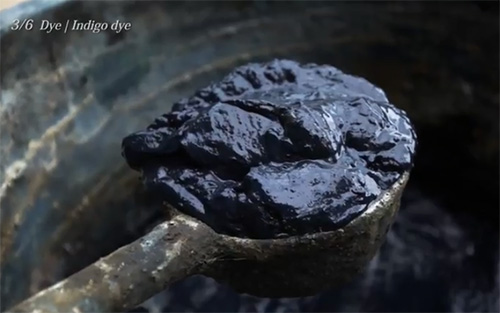
Ready mud-indigo dye
Ryukyu indigo itself is insoluble and the blue color only dissolves in alkali so we ferment the indigo liquid adding alkali which is called “ai date”, which means “indigo building”. Sugar, such as awamori liquor or starch syrup, is added to catalyze the fermentation.
The yarn is immersed in water beforehand, so the dye soaks in well. Water is wrung out of the yarn with care. To dehydrate it completely, the yarn is spin-dried.
The craftsmen practice one more curious action – they slam the yarn on to the wooden floor or pallet. It loosens up the edges of the tied knots, so the dye soaks in more easily.
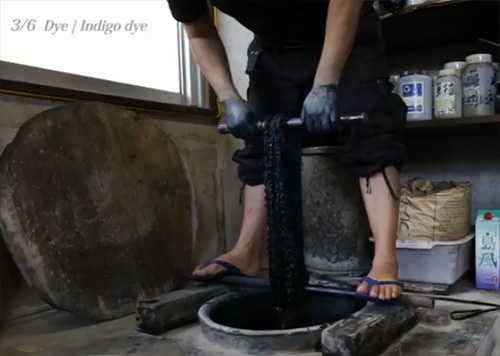
The process of dyeing yarns in indigo dye
When dyeing with Ryukyu indigo, we start with white yarn and, because our indigo dye bath in the pots are especially thick, we get the dark navy-blue color in about 8 to 10 dyes. The yarn is turned over during the dyeing so that there is no unevenness in color. After a while, the dye is wrung out of the yarn.
By touching oxygen, the yarn turns into a beautiful indigo color. This process is repeated several times until it reaches the necessary thickness of color.
Other natural dyes – fukugi (gardenias), sharinbai (hawthorn), and others
Fukugi (gardenias) is a natural dye that represents Okinawa, but it wasn’t used as a dye before. As traditionally, the fukugi tree has been planted as a protection tree around the houses. Nowadays, we use pruned branches and leaves for fukugi dyeing – they turn into a bright yellow color.
Fukugi dyed yarns that became a shade of yellow
When we extract the dye, it’s almost like brewing tea – extracting the first brew, second brew, until the fifth brew, to get the color. The yarn is lined up in the dyeing machine and first, water is poured and immersed so that the yarn absorbs the dye better. Then, the fukugi dye, brewed and extracted in a pot, is poured into the machine. The yarn starts to turn yellow. The yarn is dyed until they get the right shade of color.
Other than the yellow fukugi dye, there are many other natural dyes such as the brown sharinbai (hawthorn) dye.
Chemical dyes – dyeing the yarn with chemical dyes
First, the pot is filled with water, the necessary amount of dye is dissolved and stirred. The wet yarn is spin-dried and prepared for dyeing. The yarn is dipped in dye and turned over to prevent unevenness in color. When the color starts to settle, the craftsmen start to heat the pot. The type of chemical dye used here is acid dye and metal complex dye, which can dye animal fiber such as silk and wool. The temperature is increased little by little. First, they heat the dye bath up to about 70°C and in order to fix the colors, the temperature is increased to about 90°C. When it reaches 90°C, they maintain it for about 30 minutes so that the color is fixed completely.
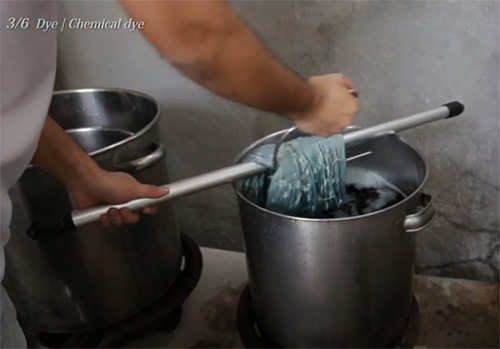
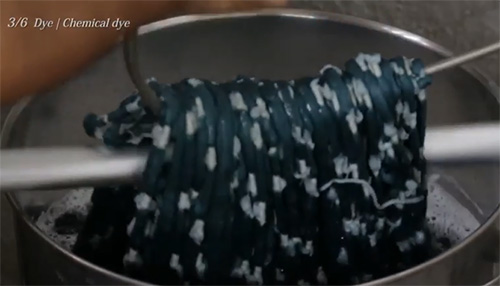
Dyeing the yarn with chemical dyes
After 30 minutes, the heat is turned off and the dyed yarn is washed. Extra dye and chemicals are rinsed off, the yarn is dewatered and dried. The washed yarn is spin-dried in a dehydrator and naturally dried outside.
Cotton, used for the tying, is a plant fiber, thus does not stain with this chemical dye.
This is how the bright colors of Ryukyu kasuri are dyed.
Step 4. Preparation the yarn for weaving
Difficult and technical, but an essential process before weaving. The weft and the warp is prepared differently and separately. It is a time-consuming process, involving several complex processes.
Drying and stretching – the yarn is starched and dried, to prevent stretching and shrinking
In order to even out the tension of the warp and also prevent friction of the yarn during weaving, the yarn is starched with glue. After starching, it is dried outside, making V-shapes to even out the tension of the yarn.

Drying the dyed yarn after starching it with glue
Untie – releasing the tied parts of the dyed kasuri yarn
After the dyeing, the tied parts must be untied. Each of the ties is raveled out by hand. The knots are tied in a special way so that it can be easily pulled off. The tied parts are left white.
Warping colored yarn – preparing necessary length and amount of dyed solid color yarn
Dyed solid color yarns also need to be warped before weaving. First, the dyed yarn is rewound to bobbins and lined up one by one, depending on the color and length of the fabric. The number and color of yarns are prepared to suit the width and length. The tension is controlled by hand, as the yarn is warped. Many colorful yarns are being prepared as the warp yarn. Each yarn is prepared one by one.
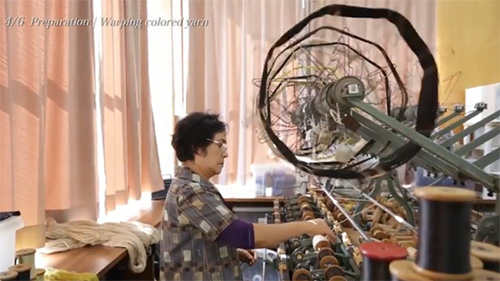
Warping solid color yarns
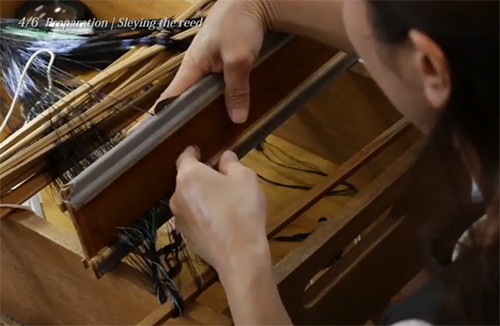
Sleying the reed – puling the warp threads through the loom
Threading the warp yarn through the reed, in the same order as the pattern. Minding the order of the yarn, the warp is lined up and threaded through.
Warp beaming – solid color yarns and kasuri yarns beamed together, creating a warp pattern.
Puling the warp threads through the loom
The next process is the warp beaming, making the beam called “taiko”. This is when we check if the warp patterns are matching or tie parts of the thread where it is cut. Such small amendments are made during the warp beaming. Tie-dyed kasuri yarns and solid color yarns are brought together to make a pattern. The tension is kept strong while the beaming, so the yarn does not wrinkle up.
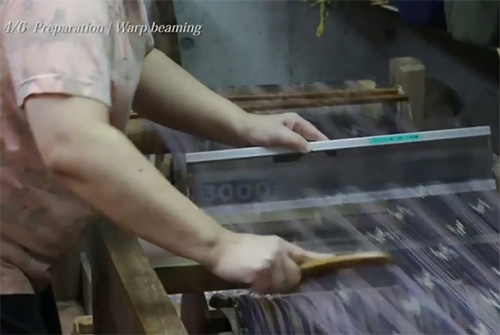
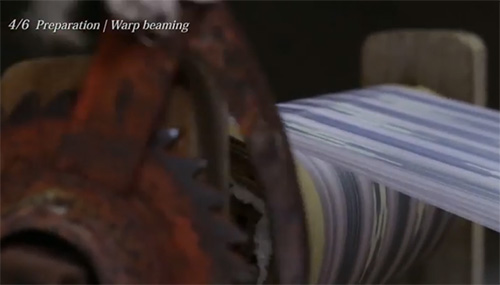
The process of warp beaming – solid color yarns and kasuri yarns are beamed together to create a warp pattern
Threading the heddles – threading the upper warp and lower warp through the heddle
Heddles are part of a loom which separates the upper warp and lower warp. It is an essential part of the loom as the weft goes through the space made by the heddle. The heddle in Okinawa is made by threads, and each warp goes through it. The heddle yarn is passed through the upper and lower warp. It is a time-consuming process in which 1,000 to 1,500 warp yarns are threaded through one by one. The finished heddles are then directly attached to the loom.
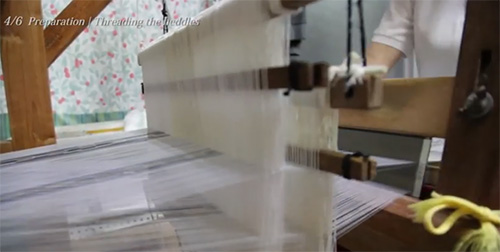
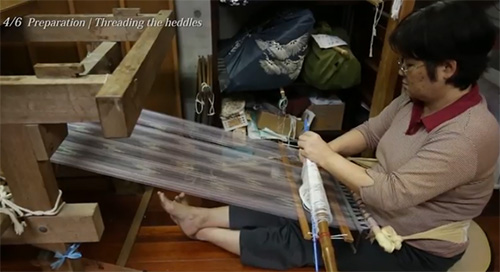
Heddles attached to the loom
Dividing the weft yarn – dividing up the weft bundle into one thread, to prepare for weaving
The weft bundle is divided into one thread in several processes before weaving. The first divide called the “o-wake” divides the bundle in half. The dyed and dried weft yarn is divided in half and wound around the hand. Preparation for Ryukyu kasuri requires large spaces.
After the first divide, the yarn is divided again in the second divide called “naka-wake”. The yarn is divided until it becomes a bundle of 20 threads each. The craftsmen reached mastership in winding the yarn to the hand at very high speed.
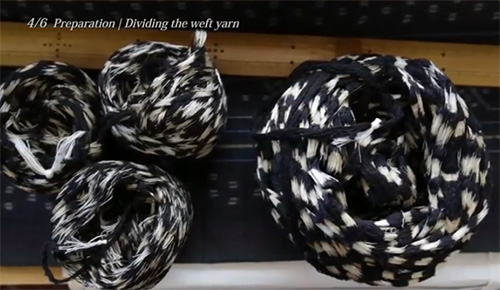
Dividing the weft yarn: yarn from the 1st divide on the right and from the 2nd divide on the left
After the second divide, there is the last divide which separates the yarn to one thread. It is a process called “ko-wake” and separates the yarn in half again. Unlike the first two divided, which was done by craftsmen specialized in preparation, the last is done by the weaver who will separate the 20 yarns to one.
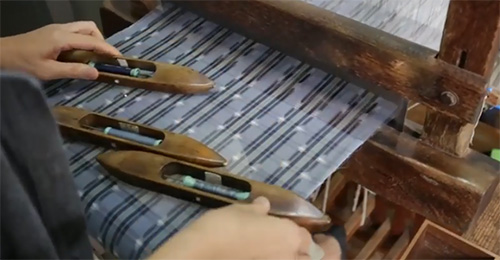
Pirn winding – winding the divided weft thread to a pirn and creating a shuttle
The kasuri thread divided into one is then wound to a pirn, which is going to be attached to a shuttle as the weft, and woven out to create a kasuri (ikat) pattern. The pirn is inserted into the shuttle, which will weave out the weft on the loom.

Shuttles with a pirn of threads
Step 5. Weaving
Weaving solid color yarns and tied kasuri yarns together creates beautiful fabric. The warp and the weft finally meet, making the cloth. Weaving while matching the pattern takes time and skill.
Weave – threading the weft thread through the warp threads under tension
The yarn threaded through the heddle is first set on the loom and the weft, which was inserted in the shuttle, goes through the warp. The upper warp and lower warp are separated by using foot treadles on the loom. The weft shuttle goes through that space. An important part of weaving is beating the reed – it impacts the threads and makes the woven cloth firmer.
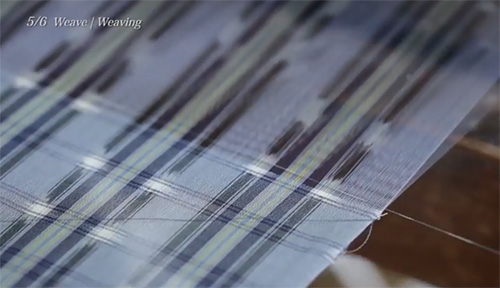
Weaving double ikat pattern
Patterns where the warp and weft ikat overlaps (double ikat) remain white. The double ikat parts are woven with careful attention to match the pattern. The delicate patterns are made possible because it is hand-woven. The weaving speeds up for parts other than double ikat patterns. Each time the weft shuttle is thrown in, it is beaten with the reed and woven.
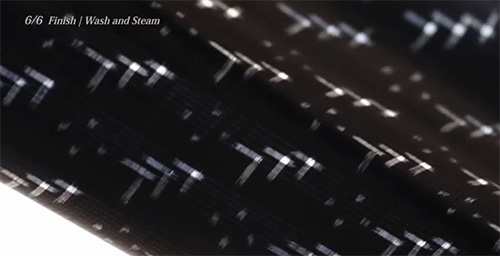
Step 6. Finishing the fabric
It is the last process in which the woven fabric is washed, steamed, and dried to prevent shrinking and balancing the right width. The beautiful fabric blends in with the landscape of Okinawa.
Wash and steam – washing and steaming the fabric for finish
As the yarn is starched with glue before weaving to make it easy to weave, when the weaving is done, the fabric must be washed. So they bring it to a specialized washer called “yunoshi-ya” for the final process of finishing the fabric. The fabric is steamed and washed to make the width even, and dried outside on a sunny day. The fabric flaps in the wind as it is dried.
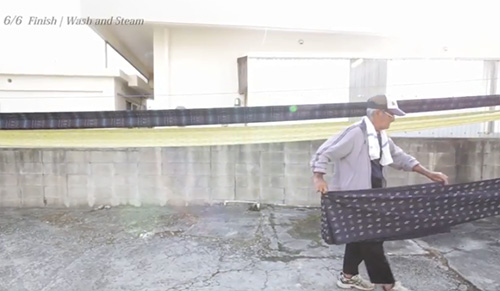
Drying the kasuri cloth after the last washing
After the fabric is sent for inspection, the process finally comes to the end.
Read also: Yuki-tsumugi weaving technique. How to make Japanese hand-woven silk fabric
(c)